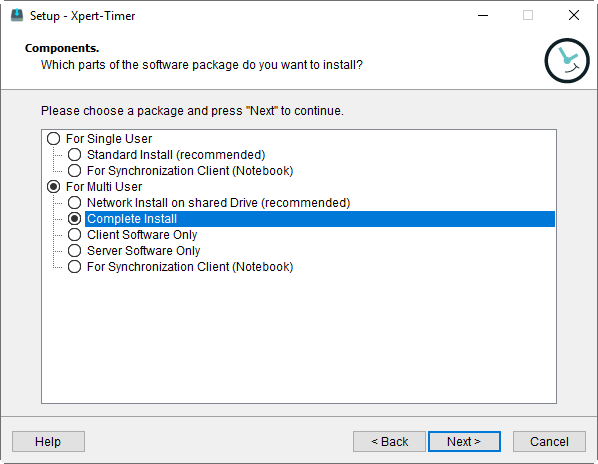
When setting up Xpert-Timer you have multiple options to choose from. Here's a short description about the different options:

In most of the setups you can choose what type of database you want to use in the next step.
For single users / Complete Install: (Xpert-Timer, XTAdmin, Database)
A Microsoft Access database is installed with your Xpert-Timer. This is perfect, because you can later add more users without changing the database type.
For single users / For Synchronization Client (Notebook): (Xpert-Timer, Access Database)
Use this setup if you want to install Xpert-Timer on a laptop that serves as a Sync Client.
For Multi User / Network Install on shared Drive (recommended): (Xpert-Timer, XTAdmin, Database and xperttimer.ini in the program path)
A Microsoft Access database is created and you should run this setup with the target directory on a network drive. The xperttimer.ini file is saved on the network drive as well, so all users access the database through the same .ini file.
For Multi User / Complete Install: (Xpert-Timer, XTAdmin, Database)
In case you want to install Xpert-Timer on every single computer or on a network drive, but save the xperttimer.ini file on every single computer, choose this setup. This setup also includes XTAdmin (Administration program).
For Multi User / Client software only: (Xpert-Timer)
This setup is used, to only download the XpertTimer.exe without the administration program XTAdmin. You can use this in case you want to install on every computer.
For Multi User / Server software: (XTAdmin, Database)
Use this setup on your server to install XTAdmin.exe. This way you can create the necessary databases on your server. Xpert-Timer itself never needs to run on the server directly.
For Multi User / For Synchronization User: (Xpert-Timer, XTAdmin, Database)
Use this setup if you want to install Xpert-Timer on a laptop that serves as a Sync Client.
|
We suggest to use a MySQL database in the multi user environment. |
|
If you are not sure what setup to choose, chose "For multi users -> Complete installation". You can't do anything wrong with this setup. |